Wednesday, July 5, 2017

Inside projects

So let's talk about indoor projects a bit. I've been in my house now over a year and have been collecting things to put on the walls. I am slowly starting to put things up.  This little montage is in my dining room.  The Amazing Grace sign was white and I just did a thin coat of a super light pink to get it to pop.

The close up here is a quilt square I made to fit in this 9 inch square frame. I know it's hard to see but on the top lefthand corner is a fabric I have been hoarding for seriously at least 15-17 years!!!  The fabric is too thin to use in an actual quilt but I thought, here's my chance!  Oh how I love that couple caught in a tango. 
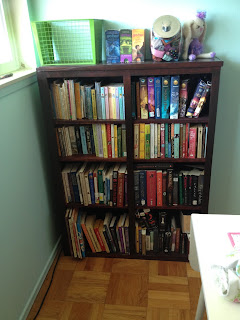
And next is this bookshelf.  I don't have a before picture but if you can imagine a crappy unloved, dirty and stained wooden shelf then you'll get an idea of what the before was! haha!  But, I took a step out of my comfort zone and bought an electric hand held sander and went for it!  It was so much fun. So. Much. Fun. The hum of the sander drowns out all sound and it's just you and the wood and once you get the outer layer off the beauty starts to show itself. Then I could see the potential.  I did like 2 coats of mahogany which I did not love so I followed it with a dark brown (don't remember the color name) minwax stain.  

Before I got in my sewing room and books loaded on it I still wasn't sure.  But that's the great thing with natural wood, you can always start over again!  But, I really do like it so it's a win!  This is just to the side of my sewing machine table in corner.

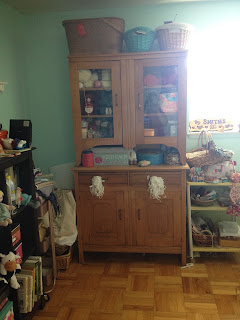
Hmmm, I don't know if I've introduced this hutch yet?  Well if I have sorry to repeat myself!  This is currently housing my yarn and sewing patterns and lots of miscellaneous stuff!  But, I wanted something I could close the doors and hide some of my clutter so it works perfectly.

I finished this little red white and blue pom pom banner just in time for 4th of July. It's so cheery and has a bit of sparkle in it which I know you can't tell in the picture.

So I guess that's it for now. I had a lot to catch up with so I tried to break it into smaller posts but each one became it's own.  I think we're up to current though.  I do update more frequently on instagram because it's so easy to do!  But, I know I'll keep my blog going as well because I tend to have more than just a caption to say on things.  

Speaking of more to say, I have more to say.  I'm still bumping along my widowhood journey as I know I always will. Lately, if it wasn't for this house to focus my time and energy into and my Mom to talk to, I wouldn't be in a great head space. Life at this stage can be kind of lonely...and there are occasional setbacks emotionally.  I am thanking God for getting me through. I am slowly realizing that even though I am building a new dream and home for myself in the singular, Scott is still there always in my heart. In the beginning after he first died I did not think that was possible and felt I would be betraying him somehow. I guess I just wanted to put that out there for anyone else that may be at the beginning - the pain never leaves but it does change, you learn to live with it. And while I scoffed at the idea of "moving on", there is a way to live on still holding love in my heart.  I will always miss him every day, that will never change. 


Monday, July 3, 2017

of socks and quilts

Okay, so, I finished a sock!  yippee!  My friend Leigh came out with a set of socks on Ravelry called Louleigh's Simple Socks (click for link). I followed the stitch pattern for the "Socks with holes in" and have really enjoyed it!  The pattern is written for cuff down but is easily modified to do toe up, which is my preferred method. I just have gotten my toe and measurements down so I just figure out the pattern repeat and plug it into my numbers.

For the heel I did the Sockmatician Toe Ups (click for link) by Nathan Taylor. I did that heel on my last socks but didn't quite understand what I was doing so gave it another go.  This time around I think it definitely clicked better and I had left myself a couple of notes that helped as well. My gauge is super tight though so I had to consciously relax my hands.  That's no fault of the pattern obviously! ha!  The yarn is exactly as everyone says about self striping: it is addictive!  I just kept feeling like ooooh I want to see the next color.

In quilting news: I started this donut quilt.  Not sure when? Maybe April or March?  Anyways I had seen a quilt pattern called Donuts which is by Johanna Masko. (click for link) I liked the idea but did not initially want to make it. Really what it comes down to is that I did not want to buy the pattern, which is generally what it comes down to with me and quilt patterns.  

But the idea kept coming back up. So I figured out my own pattern based on the shape.  Really if you look at it you can see that it is a cross between a nine patch and road to Tennessee blocks. I have not seen the pattern in person so I don't know what the pattern measurements and finished block sizes are, so I figured out the size I wanted to end up with and went from there!  Right now I'm not planning a border.  Each square color represents a different flavor.  Chocolate brown, Berry, lemon, blueberry, sprinkles, strawberry, honey, lime.  I think I'm going to do one more row and then call it good.


Sunday, July 2, 2017

how does your garden grow?

I've got lots of updates in my yard to share today.  We'll start in the back yard which is honestly still pretty grody but has had a lot of progress made.  
In the picture on the left is where I ended last summer.  I had killed everything in the back yard and moved over the garden frame which was on the other side of the yard completely in the shade.  The garden box was already here when I bought the house last year.  The photo on the right shows the beginning of this spring.  When everything started coming up green I was so excited! Then, after the first cutting I realized it was all fox tails!!!! Rude. So, I set about pulling them - by hand.  It's verrrry slow going as you can imagine. But! If I weed eat them the heads that have the seeds just go on the ground so this way I am eliminating some of the seeds.


And here we have the day I planted the garden!!!!  Oh that was an exciting day for sure.  I bought already grown plants for most things. Next year I will start things from seed indoors.  I'm learning, slowly but surely!  See that cart in the background?  That is my weeding cart. I try and fill at least one or two cart fulls every day. This past couple of weeks I have not been hitting that mark but still do something every chance I can. Slow and steady I am reclaiming my back yard!


So photo on the left after a nice drenching rain. Photo on the right this afternoon.  I thinned out the onions in the bottom lefthand corner so I know it looks bleak but they are just thin shoots but still there.

 And I have baby tomatoes!!!!!!!  Oh happy day!  I have one group that will be yellow pears and another group of cherry tomatoes.  I have not had any success growing tomatoes up here in the past so this is very exciting!


Now for the front yard. The front is like a whole different house. Ha! My HOA takes care of the lawn in the front yard, keeping it green, aerating and mowing.  So it's lush in front and weed free.  I have two flower beds, one on either side of my walkway.  This first picture is in front of my living room window and there's a bit of a covered porch area behind the roses.  The roses and rhubarb were already here, and the rest before I started planting was grass and weeds.  I pulled everything out back to dirt and planted flowers.  The purple is veronica, in front of that are pink carnations, next is a spirea that is small now but will be a shrub eventually. 
 

The flower bed on the other side I don't have as many photos yet.  On that side there is a giant rose bush that was already there, and tucked behind it was a clump of lilies. It also was full of grass and weeds. I did the same thing here, pulled it all back to dirt.  There are also a bunch of rocks so it makes me think at one point maybe it was filled in with gravel? Anyway, I thinned out the lily plant and divided it into 6 plants and spaced those evenly in front. In the back row on either side of the rosebush I alternated lavender and purple salvia.  In between each lily plant I put in some iris tubers that a friend gave me from her garden.

Everything is filling in very well, which makes me happy.  I can see what I want it all to look like in my mind's eye.  I know it's going to take a long time to get rid of the weeds and replace with healthy grass and flowers. But! With God's grace I have hope.