Monday, December 25, 2017

Quilts of all sizes

 I have been busy busy over here lately so blogging has sort of fallen by the wayside. But! Never fear, I have been sewing and knitting for sure. A lot of gift making really, so also I had to wait to share until I had given the stuff.

First up is a baby quilt.  I started this back in the Summer for a new baby in Scott's extended family. I know it's hard to see but each middle square is a fussy cut from Guess How Much I Love You prints. The pattern was from the May/June issue of Quilty magazine that I thought would showcase the middle squares well.  The fabric was super cute and fun to work with and everything came together really easily.  I gifted this quilt at Thanksgiving.
Close up of one of the middle squares:
I'm not sure if I've talked about this next project before. If I have, forgive my forgetfulness :) grin! I knitted this little guy from a pattern called "Sven and Solveig Scandinavian" by Cottage Creations. 


 This was a fun knit!  As I was knitting him I really felt like his name was Jurgen instead of Sven. The pattern is super fun, lots of charm and little hints in there about dollmaking - like ways to customize via name, hair color, sweater style. The pattern shows Sven with a white beard but as I was knitting I felt like Jurgen was a younger guy with darker hair and maybe a clean-shaven face.


A friend of mine asked me if I could make a doll quilt and pillow for her daughter for Christmas.  This was a no brainer! Of course I said I could! She sent me a link so I could figure out measurements and such. It's this duktig bed from Ikea.  I did a quick google search and found a blog called One Little Project that has a whole series on bedding accessories for the exact bed! Sweet!  
 Next I picked out fabrics for a little patchwork quilt - this was so FUN! I have so many fun girly prints and I really had free reign to put in what I thought she might like.  So the tutorial that I linked was for more of a blanket, which would have been fine but I really wanted a mini quilt.  I think I used 5 inch squares for the top. I drew straight lines on the top in erasable ink and used my walking foot to do the quilting lines.
This was the first time I used the walking foot attachment with my machine and it was great! Super easy and I'm very pleased with the stitching. If you've ever stitched straight lines without one you know that the fabric can get pushed by the foot and cause puckers and pleats especially where the lines intersect. With the walking foot it doesn't do that.

Here's the final product under the tree for Christmas!  I'm pretty sure that pillow came out way too big!!!! Yikes. I'm not sure what happened there?  oh well. I made a pillow with sheet fabric and then made a reversible pillowcase to coordinate with the quilt. The reverse fabric is the bright pink print in the quilt.

And, since it's Christmas I did make myself a little something. One thing I love, love is Christmas Nutcrackers!!!!  I have a collection of wooden ones and ornaments that I love.  I was in Joann's Friday night when I spotted some nutcracker fabric. Eeeeeeee! I bought some, came home and washed it and Saturday made this lined drawstring bag! Their faces just crack me up (get it, lol)! I also made a needle cozy to match since I'm going to put my Christmas sock project in there. 
So, that's it for me here this week. I hope you all had a nice holiday season! Mine has been very reflective and calm, which has been nice. It's almost a new year! What are your plans?

Sunday, October 1, 2017

Dollmaking

So I made a doll yesterday.  I had an idea in my head starting out and once I got to the face it totally changed.  The little face turned out so sweet. I did a satin stitch for the eyes which actually turned out really well :)

I've made a lot of dollies but have not tackled yarn hair since the dolls I made as a child. For a long time it just intimidated me, I could not think of a way to secure the fibers.  That is one thing that is important to me when I give a gift to a child - I don't want the thing I've made to fall apart easily. And yarn hair?  Well, that just sounded like it could be pulled out too quickly and then who wants to play with a bald doll???  

Ok anyways, back to the subject! I did a quick google search yesterday morning prior to starting the doll.  I found this post from Fig & Me that had some interesting pointers and lots of links to other makers/blogs which is where I found the one I ended up using: Crafty Sheep's post called Waldorf Doll Hair Tutorial.  
I have included the links if you'd like to check them out. The Crafty Sheep tutorial was easy to follow and solved the mystery of how to get all the strands of yarn under control and sewn on fairly quickly and easily.

Okay, let's talk about pattern.  I draw inspiration from a lot of sources. I have a couple of books in particular that inspire me which are shown below.  I also have a few patterns that I reference. Usually what I do is pick a pattern and trace the parts I like and modify as needed to get the look I want.  For this doll I used the body pattern from the We Make Dolls! book shown below but I changed the head by taking a plate and re-drawing the top of the head.  I use a pen with erasable ink to draw the face on by hand then embroider around that.

p.s. I should say that the links I share are just meant to be helpful, not tryna sell anything and I'm not paid to share. Sorry, I figure that is obvious but I know that's a big deal for some people......uggggg....so there you go.

Ok, this next set of photos is for my Mom.  We were discussing doll patterns and I told her about this one that I have had probably since high school and I found it either in a thrift store or yard sale...don't remember now. But, I LOVE it.  You can see it is from 1965, and was in a Woman's day magazine. I don't know if the pattern was included in the magazine or if the lady ordered the paper pattern from there.  I have all the pieces for the Annie Doll and the mini. One thing I love about finding used patterns from older generations is the handwriting. I know it's faint, but above the title it says "17" tall doll" in cursive.  Handwriting like that is slowly fading away I think.

The photo on the left is the magazine clipping of the article.  The photo on the right is an advertisement in the magazine that I just think is funny!  "The place to be is Puero Vallarta"
Anyways! I also altered the arm from the pattern. I made that little triangle of dress fabric be part of the arm instead of sewn as one complete piece. I also added a little collar to the body which turned out cute!  I think she turned out really well. I did tack the hair down a bit on the sides but not all the way across the back of the head, which in hindsight I might have done.  Meh. maybe next time.

At the last minute I added satin ribbon bows for her pigtails.  The little girl I made this doll for loves really girly stuff so I thought that would really add to the girly factor.  What do you think?  I think this little doll is ready to be a friend, to share secrets and adventures and hugs!  

In other news I am making a spaghetti sauce in my crock pot today. I threw in the last bit of my roma tomatoes from the garden and some zucchini as well.  It should be yummy!!!  I love cozy Sundays :)  Have a great week!!!!

Thursday, September 28, 2017

catch up post 4 - all about the fair!

So this year for the Tulelake Fair I decided to branch out a little bit. I decided to enter Hortense the mouse and, AND a quilt!  This particular fair the quilt competition is pretty tight.  But, from going previous years I knew that my quilts are a very different style than a lot of the other entries. I decided to enter my Churn Dash quilt.

Here's my stack of goodies.

Ok, first prize was my socks!!!!  I was a little surprised by this one I have to admit.  While I do love my socks I didn't know they'd place that high!  I was a little confused at first because the tag says "mouse" and the tag on my mouse says "socks". But I think that it was the socks that did win.


Second place - my Highway 101 shawl!!!!!  Holy cow you guys!  I was competing against myself because I had entered everything in the same category!   

Poor Hortense, she did not win anything.  But, she did get to have an adventure!  And, reading back over the rules I could not have won again since they were all entered in the same class.  Which really is totally fine!  I did not expect to win first and second in the same class!  Frankly I didn't realize that until I just re-read the rules.   
Here's the exciting thing:  My quilt won THIRD PRIZE!!!!  OMG. I scoped the room as soon as I walked in and saw it across the room on the other side.  I did not expect to feel as proud as I did - I wanted to tell everyone "that's my quilt! I made it!".  Luckily my friend Jan was with me and shared the exciting moment with me.  Here it is up on the wall - and official entry in the county fair.  Mine is the one on the right.

 Jan got this fun picture of me in front of my quilt.
I had a lot of fun entering the fair for myself.  But, that's only half the fun!  The other part is seeing what everyone else is doing.  There were some beautiful hand knit entries. My friend Lilly entered a few of her hand knit baby clothes.  I also recognized some of the names of people I know on different entries.  It's fun when you see someone's name and discover something you didn't know they could do!

I'll leave you with this cute llama quilt I saw - isn't that amazing?!  So fun!

Tuesday, September 26, 2017

catch up part 3 inside edition

This post is to catch up on sewing and knitting projects.  First up, this little zipper pouch.  This is one of those projects that I had literally no choice in making. I woke up one morning, was scrolling instagram and saw a little hexie pouch in the "you might like" mish mash of recommended pictures.  I got right up and sewed the pouch right then - it needed to be in my life!  If you want to check out my inspiration it's from What Saysie Makes, and I'm also linking the blog post where she talks about it.  Her blog is beautiful as is her instagram profile.  Anyways, I obviously didn't have the same fabrics she used, but that's totally fine!  I have tons of cute fabrics to choose from!

Next up is this vanilla sock.  I know lots of people have said that they like this sock but I personally do not love the yarn.  Or, rather, the colorway. I tried a new to me pattern for the heel, it's called the OMG heel and you can find that pattern on Ravelry.  I really actually liked the heel, it was very very well written.  It was so clear and did not make any assumptions about heel knitting experience which I really appreciated.  I have knit a few knitting patterns where the designer assumes certain things are "understood" and I was the person who just didn't get it!  Thank God for google.  
I just had to include this sweet puppy picture. I woke up for work one morning and this was my Rocky dog sleeping next to me.  His ears! 

Ok so this next project is completely Kay Jones of the Bakery Bears fault inspiration.  She had talked about it on the podcast, and at first I was like - no, I don't need to knit this guy.  Then! she mentioned it again and talked about her inspiration and how she had seen it on instagram made by Lori so naturally curious I checked it out and I was like oh man I need this pattern!  It's called Sven Scandinavian.  So incredibly cute and detailed!!!  
It's a paper printed pattern so I ordered it from the website, Cottage Creations. Kay mentioned on the podcast that the service was really good and she had gotten a confirmation email after she ordered. I have to just say that she was right! I also got an email but mine was to let me know that the pattern was being reprinted because Carol, the designer, had run out of copies!  I emailed her back and let her know that I was not surprised since I had seen it on the podcast and I know there are a lot of followers both there and Lori's instagram.  

I received the pattern a couple weeks later, which I thought was great considering it had to be reprinted.  I set to knitting my version of Sven right away.

There are name suggestions in the pattern of alternate names. Carol encourages everyone to think of names as you're knitting.  I love that!  I have always felt as I make a doll, whether sewn or knitted, that their personalities develop as they are made. So, my Sven has actually turned out to be Jurgen! Isn't he cute?
Last weekend I had a baby shower to attend. The baby's room theme is cacti.  I knew I wanted to make a quilt as my gift.  I did a little google search, and found this quilt. I bought backing fabric and white on Thursday, prewashed it after work. I decided to do two rows of squares for the body of the cactus.  I pulled all green fabrics from my stash and didn't have any repeats!  I pieced the front after work on Friday and put everything together and quilted on Saturday before the shower!  Yikes! I was a bit late to the shower because I wanted to wash it before giving so it would pre-shrink.  She really liked it so that is a win!

I'll leave you with this picture of my fall mantel.  Mom, if you're reading this - that scarecrow is the one I was telling you about with the sign "no crows" and then I like to put that crow sitting next to him! ha! 


Monday, September 25, 2017

garden catch up part 2

This garden catch up is the flower edition.  These first pics are in the front yard.  The front yard is significantly easier because I have an HOA which maintains the grass in the front. I do have 3 flower bed areas that are mine to maintain but it's not as overwhelming as my back yard which is a foxtail dead zone nightmare.  But! I am slowly reclaiming it :)

 I know I've shared pics of these flower beds previously but I have made some new additions.  Home Depot had bark mulch on sale for Labor Day weekend so I grabbed a few bags to help with weed control in the front.  And it looks nice too :)  I also picked up these pretty pink coneflowers, I put one on each side of the giant rose bush. Which I still need to prune back! Yikes.
The yellow is rudbeckia. The flowers only lasted a day, then pooped out. But, the leaves are still green so I have hope the plant will live.  In the back row you can see my lavender and salvia did really well through the summer. That salvia is about double the side of when I put it in and the bees love it!

Oh man, this was a great day.  So I stopped in Freddy Meyers to pick up a prescription and the pharmacy computer was down.  What's a girl to do?  Check out the clearance plants, of course!  I totally hit the jack pot!!!  They had just gotten a shipment of mums and the clerk was marking a whole rack as clearance - 50% off!  He said the leaves were droopy and dirt a little dry but the roots weren't dry.

Well, I know from experience that clearance plants usually perk right up after they are planted, watered, and loved!  So I filled my entire cart with mums!  I was planning to buy some anyway so it was really perfect timing.


I planted them around the crepe myrtle tree in the front yard. I have quite a few different colors which are kind of fun.  I have to admit planting around that tree was not fun at all!!!!  The soil is super compacted and the roots of the tree are all over.  I wore a hole in my hand digging holes for the plants. I did manage to also put a ring of daffodil bulbs, tulip bulbs and crocus bulbs all around under the mums.  Hopefully once springs rolls around it will be beautiful!


So, a small update in the back yard. I started the spring/summer thinking that I would be able to pull out all the weeds and reseed the grass. I must of thought I was 10 people with tons of time and energy!  Needless to say that is not what happened!  I did get the hill weeded and a couple areas down to dirt.  Which then invited new, different weeds :) Boo.  

But!  This weekend I thought I'd get after it again.  My tools of choice are my rigid tine rake that I rake as much of the dead weeds out as I can.  Then I use my hoe to pull the foxtail seeds into a heap.  Then I put them in my little cart which I dump in the trash.  It is slow going.  The hill also has a bunch of rocks, for stability I imagine, that hold up the raking process.

 I did manage to claim a small victory in a corner on the hill today!  Woot!  I picked this particular corner because you can see it from the couch in my living room when the curtains are open to the sliding glass door.  I have been dreaming since I bought the house of being able to look out into the back yard and seeing a beautiful flower garden.  I put a hollyhock at the back, a blue aster that is very bee-attractive, a couple "goblin" gaillardia, a white salvia, and the last two mums. I also put daffodil and tulip bulbs along the bricks next to them.  I tried to build little dirt burms around the flowers to help keep the water from flowing down the slope. 

In the spring I plan to put hollyhock seeds along the fence. I also want to work on making the slope less of a hill.  I think by trying to put in steps instead of a slope I will have better success at growing things over there.  Next year I also want to put in my apricot tree! 

Sunday, September 24, 2017

garden catch up part 1

I think the easiest way to get caught up at this point is a few posts. This will be the first in a series of what I will call "garden catch up"! Oy vey, where did the summer go???  Doesn't everyone say that at he end of every season?  I know I do.
So, we'll start with the veggie garden. This was so much fun and I learned so much.  I should also mention this was my first real garden so I really had no idea what I was doing. I did a lot of googling, a lot of question asking, reading, etc. to get where I did with my garden.  

Some things I thought going into this: I would have bumper crops of things and be able to can as I went. I did have bumper crops of patty pan squash, which are the cute yellow squash above.  But, my cucumbers were kind of more of a slow steady trickle.  My tomatoes did not really ripen. Green beans pooped out.  And zucchini?  Welp, I am still the only person who doesn't grow an abundance.

 But!  As you can see I did get things canned.  I realized that I could just do small batches of pickles as I had the cukes.  Luckily I was able to find fresh dill at the grocery store in big bouquet form since my dill did not even come up.  I also was able to make strawberry rhubarb jam with rhubarb from my plant in the front yard.  A coworker of mine gave me a big box of tomatoes from her garden that she couldn't use and I made a bunch of canned salsa, which was a first for me.

My spaghetti squash, pictured above, did really well - I think I got about 5 very, very large squash from one plant.  

This past week was the first frost and everything died.  Well, except for a couple leaves on a couple of my zucchini plants which have a couple very small squash so I'm leaving them be for the time being.

I've started a little list of what I need to do differently next year, how I want to rearrange things, what plants I want to do again, add to, etc.  I had a great time with this garden and will definitely do another next year!

Some canning stats:
10 jars of salsa
8 jars of strawberry rhubarb jam
8 jars of dill pickles


Wednesday, July 5, 2017

Inside projects

So let's talk about indoor projects a bit. I've been in my house now over a year and have been collecting things to put on the walls. I am slowly starting to put things up.  This little montage is in my dining room.  The Amazing Grace sign was white and I just did a thin coat of a super light pink to get it to pop.

The close up here is a quilt square I made to fit in this 9 inch square frame. I know it's hard to see but on the top lefthand corner is a fabric I have been hoarding for seriously at least 15-17 years!!!  The fabric is too thin to use in an actual quilt but I thought, here's my chance!  Oh how I love that couple caught in a tango. 
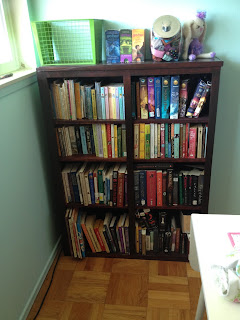
And next is this bookshelf.  I don't have a before picture but if you can imagine a crappy unloved, dirty and stained wooden shelf then you'll get an idea of what the before was! haha!  But, I took a step out of my comfort zone and bought an electric hand held sander and went for it!  It was so much fun. So. Much. Fun. The hum of the sander drowns out all sound and it's just you and the wood and once you get the outer layer off the beauty starts to show itself. Then I could see the potential.  I did like 2 coats of mahogany which I did not love so I followed it with a dark brown (don't remember the color name) minwax stain.  

Before I got in my sewing room and books loaded on it I still wasn't sure.  But that's the great thing with natural wood, you can always start over again!  But, I really do like it so it's a win!  This is just to the side of my sewing machine table in corner.

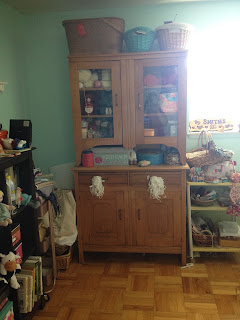
Hmmm, I don't know if I've introduced this hutch yet?  Well if I have sorry to repeat myself!  This is currently housing my yarn and sewing patterns and lots of miscellaneous stuff!  But, I wanted something I could close the doors and hide some of my clutter so it works perfectly.

I finished this little red white and blue pom pom banner just in time for 4th of July. It's so cheery and has a bit of sparkle in it which I know you can't tell in the picture.

So I guess that's it for now. I had a lot to catch up with so I tried to break it into smaller posts but each one became it's own.  I think we're up to current though.  I do update more frequently on instagram because it's so easy to do!  But, I know I'll keep my blog going as well because I tend to have more than just a caption to say on things.  

Speaking of more to say, I have more to say.  I'm still bumping along my widowhood journey as I know I always will. Lately, if it wasn't for this house to focus my time and energy into and my Mom to talk to, I wouldn't be in a great head space. Life at this stage can be kind of lonely...and there are occasional setbacks emotionally.  I am thanking God for getting me through. I am slowly realizing that even though I am building a new dream and home for myself in the singular, Scott is still there always in my heart. In the beginning after he first died I did not think that was possible and felt I would be betraying him somehow. I guess I just wanted to put that out there for anyone else that may be at the beginning - the pain never leaves but it does change, you learn to live with it. And while I scoffed at the idea of "moving on", there is a way to live on still holding love in my heart.  I will always miss him every day, that will never change.